In honor of the Pittsburgh Steelers, I decided to make a modified version of the "Primanti Brothers Sandwich" for last year's Super Bowl shindig. If you've never heard of the Primanti Brothers restaurant/ diner/ deli it's a Pittsburgh institution, and their "Sandwich" is as iconic for local residents as the cheesesteak is on the other side of the state. To summarize this icon; it's a mound of beef, topped with coleslaw, french fires, and a fried egg, which then sandwiched between two hearty slices of white bread.
 |
| Photo compliments of Burgatory.com |
As fate would have it, Alton Brown's special on dry aging beef aired a few weeks before the big game. And since I'm an adventurous foody, I decided this would be the perfect opportunity to try out this technique.
Dry aging isn't difficult and the actual process isn't terribly expensive, but there is A LOT of waste. Which explains why most restaurants serving beef prepared in this manner charge a premium. But let me assure you, it is well worth it.
If performed correctly, the aging process allows natural enzymes in the beef to break down the muscle fibers without the growth of potentially deadly bacteria. This results in a cut that is more succulent and exponentially more flavorful!
For my beef I decided to follow AB's instructions without variation, as the potential for failure (in this case deadly bacteria) was fairly high.
(to see the Alton Brown instructions please visit: "Dry Aged Standing Rib Roast")
To limit bacterial growth it's essential to keep the temperature to a minimum (typically between 35-38 degrees). Enter the spare dorm room fridge. It was the perfect size, and offered guaranteed temperature control. I also included a tray of rock salt to help salinate the atmosphere and impart an extra umph of savoriness to the meat. I'm still not sure if it improved the flavor, but I didn't die of botulism.
 |
| Day 1 |
Day 2, the beef looked "very refrigerated," but still very edible. It was noticeably less "wet" in appearance.
 |
| Day 2 |
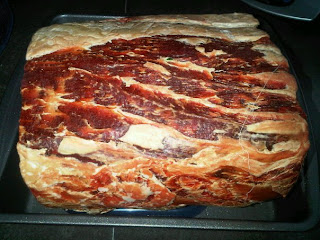
By day 4, the roast looked significantly drier, and the ruby red hue had started to fade.
 |
| Day 4 |
 |
| Day 5 |
On the seventh day God may have rested, but I did not. By day 7, the beef was ready to be cooked and had developed a mildly tangy aroma.
 |
| Day 7 |
The finished product was incredible! It possessed an unrivaled "beefy" flavor, was tender, and was maddeningly savory.
In writing this, I've come to the conclusion that it's probably time to try relive this adventure in the near future. Close friends should start looking for the next dinner invitation!
Eat good food. Drink good beer. And above all, stay classy!


Out of curiosity, what prompted you to age the beef for 7 days, as opposed to the 3 called for in AB's instructions? Were you waiting for specific signs of readiness, like color or aroma?
ReplyDelete@ V: On the show he alluded to aging for longer than three days, but did not do so for time concerns. I had also heard some of the best American steak houses age their beef for 21+ days, and even 35+ in one case. So I figured an extra four days wouldn't hurt. Thanks for the question :)
ReplyDeleteit is my regret to tell you that sam parks died from deadly bacteria.
ReplyDeletesorry to disappoint, but I'm either alive or a zombie.
DeleteHave you tried the Drybagsteak method of dry aging?
ReplyDelete